If you were relaxing poolside and inadvertently dropped your headphones in the water, or if you had a water-related event at home that resulted in headphone water exposure, don’t give up on your headphones just yet. Attempt to repair water-damaged headphones to avoid purchasing an expensive new pair.
How Does Water Affect Earbuds?
Earbuds are small and often lost in the wash, requiring you to learn how to repair earbuds that only operate on one side, among other problems. Even water-resistant earphones can struggle when submerged in a big body of water, necessitating earbud repair. If your earphones have no water resistance, even a thunderstorm or being put in a puddle can cause problems.
Save Your Headphones by Working Quickly
Moisture affects the circuitry and electronics in headphones. If the inside wiring of your headphones is still receiving electricity after being flooded or dipped, it can short-circuit and cause immediate damage. If your headphones are still connected, turn off the device’s power supply. To preserve the circuitry, separate the headphones from the power supply after they have been turned off. Acting quickly may help you save your water-damaged headphones.
How to Repair Water-Damaged Bluetooth or Plug-In Headphones
First, consider simply letting the headphones air dry for up to 48 hours. This could be the answer! If they are still not working well after some patience, you may need to disassemble them and clean them more completely following this step-by-step procedure:
- Remove any silicone, foam, or rubber tips from the headphones and place them aside to dry.
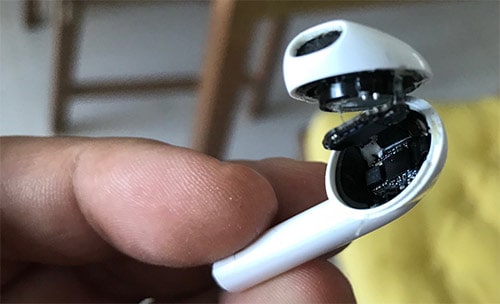
- Disassemble your headphones carefully to uncover the internal components. Screws are frequently missing from newer earbuds.
- Open the earphones carefully with a knife or flat screwdriver. Please keep in mind that this may violate your warranty, so read the instructions before opening your headphones.

- Place the open headphones in a jar of distilled (de-ionized) water, which may seem illogical. Because distilled water is noncorrosive, it will not cause further damage to the headphones.
- Shake the headphones gently inside the container to replace any residual water in the components with distilled water.
- Take the headphones out of the distilled water and gently shake any excess droplets off the sensitive components.

- Excess water should be blown off the headphones and parts using your breath.
- To avoid damage when utilizing compressed air, increase the distance between the headphones and the air source.
- Pat dry the interior pieces with a little dry cloth, paying special attention to the drivers on all sides.
- Plug in the headphones after reassembling them and allowing them to air dry for up to 48 hours.
- Ideally, your headphones will be operational after this procedure.
- If they still don’t work, try hiring an expert to restore them.
Repairing a Water-Damaged Headphone Jack
It’s possible that the source, rather than the headphones, is at blame. Headphone jacks have small pins that might rust, stick, or malfunction if exposed to water. To repair a water-damaged headphone jack, take a cotton swab and cut or remove some cotton from the end to fit into the jack slot. Insert the cotton swab into the slot and gently wiggle it to absorb the remaining water. This may fix the problem depending on how much water the gadget was exposed to.

Tips for Avoiding Water Damage to Headphones
The simplest way to avoid water damage to your headphones is to avoid getting them wet in the first place:
- Make it a practice to keep your headphones in the same position when not in use. This may assist in avoiding a trip through the washing machine.
- When storing headphones or devices, use an airtight container.
- Try considering using a waterproof container if you’re storing these products in a basement or other wet place.
- Keep your smartphone and headphones away from the sink or dishwasher and off the counter.
- If you’re going somewhere with water, consider leaving your headphones at home (pool, beach, etc.).


